A while ago, someone on reddit posted cool QR codes generated with Stable Diffusion that looked like images, a far cry from the garish squares we’re all used to. The author didn’t explain how they made the QR codes and I wanted to be able to make my own. A few enterprising redditors tried to recreate the effect using img2img, but the results didn’t compare to the original. I set out to discover their techniques and recreate them. I’ve detailed the journey here.
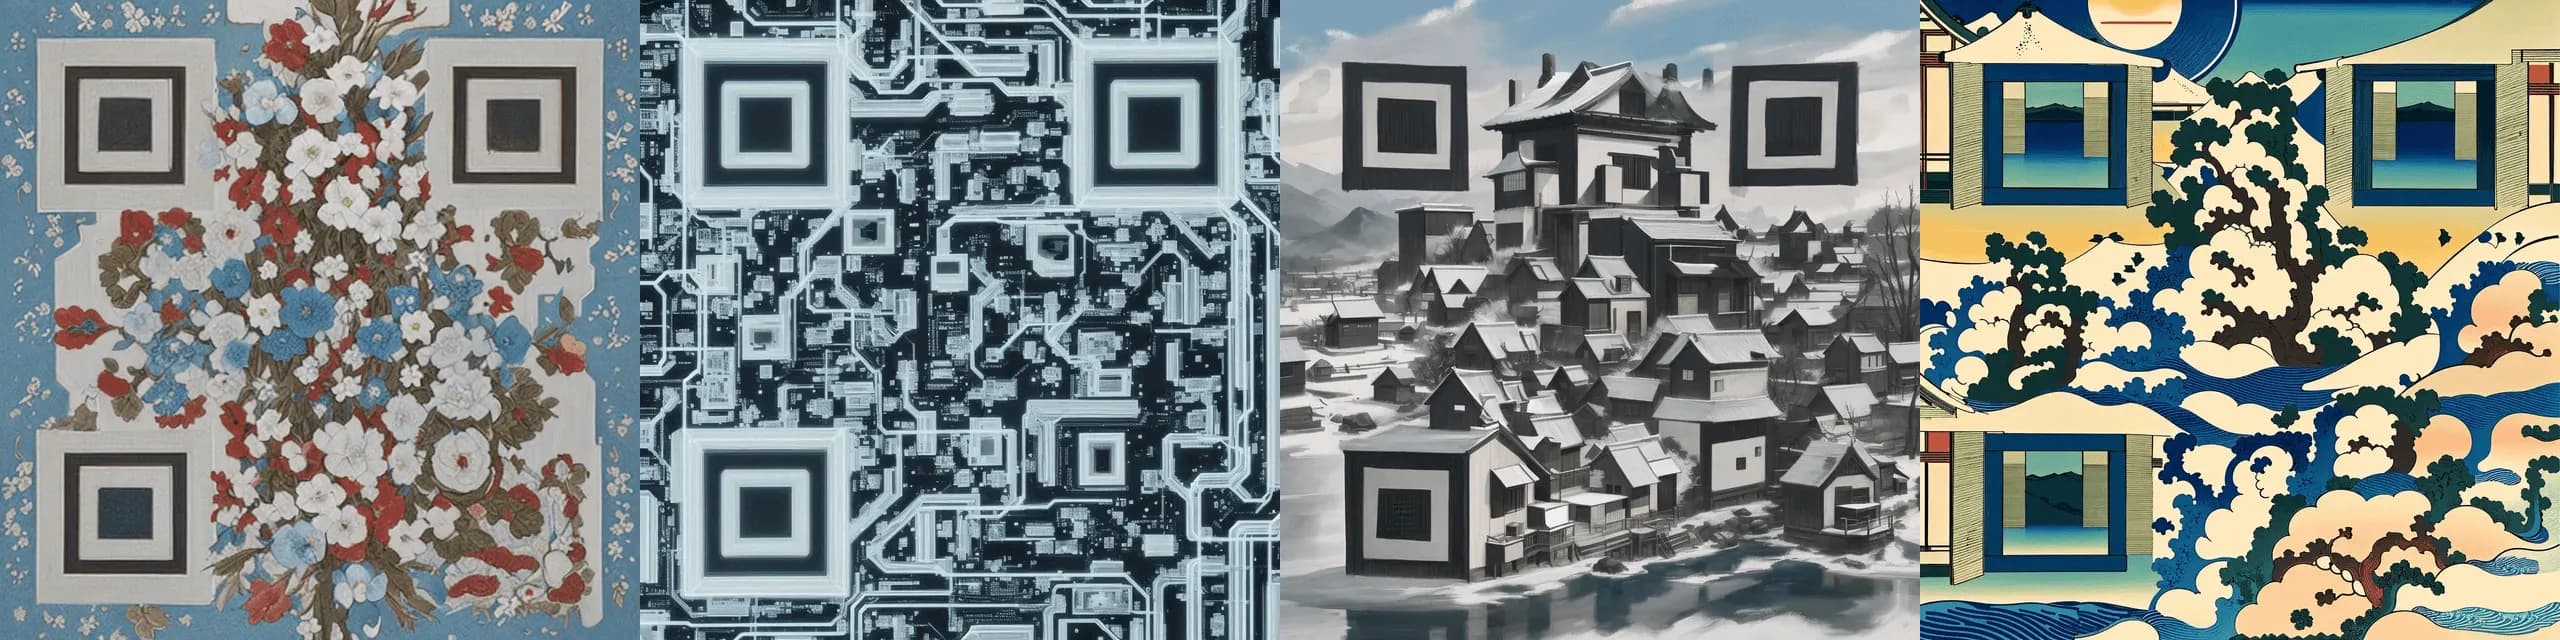 Cool QR codes by reddit user nhcaio
On further investigation, the QR codes were created by IoC Lab, who published prior work in a similar vein. Their pages on training ControlNet models were the most similar. ControlNet is a project that allows you to train a second neural network to control the output of an image generating model. ControlNet models take your prompt and a “conditioning image” which guides the output from Stable Diffusion. An illustrative example is the “pose2image” model, which takes an image of a posed human and uses it to generate an image with a character in the given pose. The main ControlNet repo has many similar pre-trained models that take different kinds of inputs to control the output. Some examples are generating images from sketches, depth maps, and more.
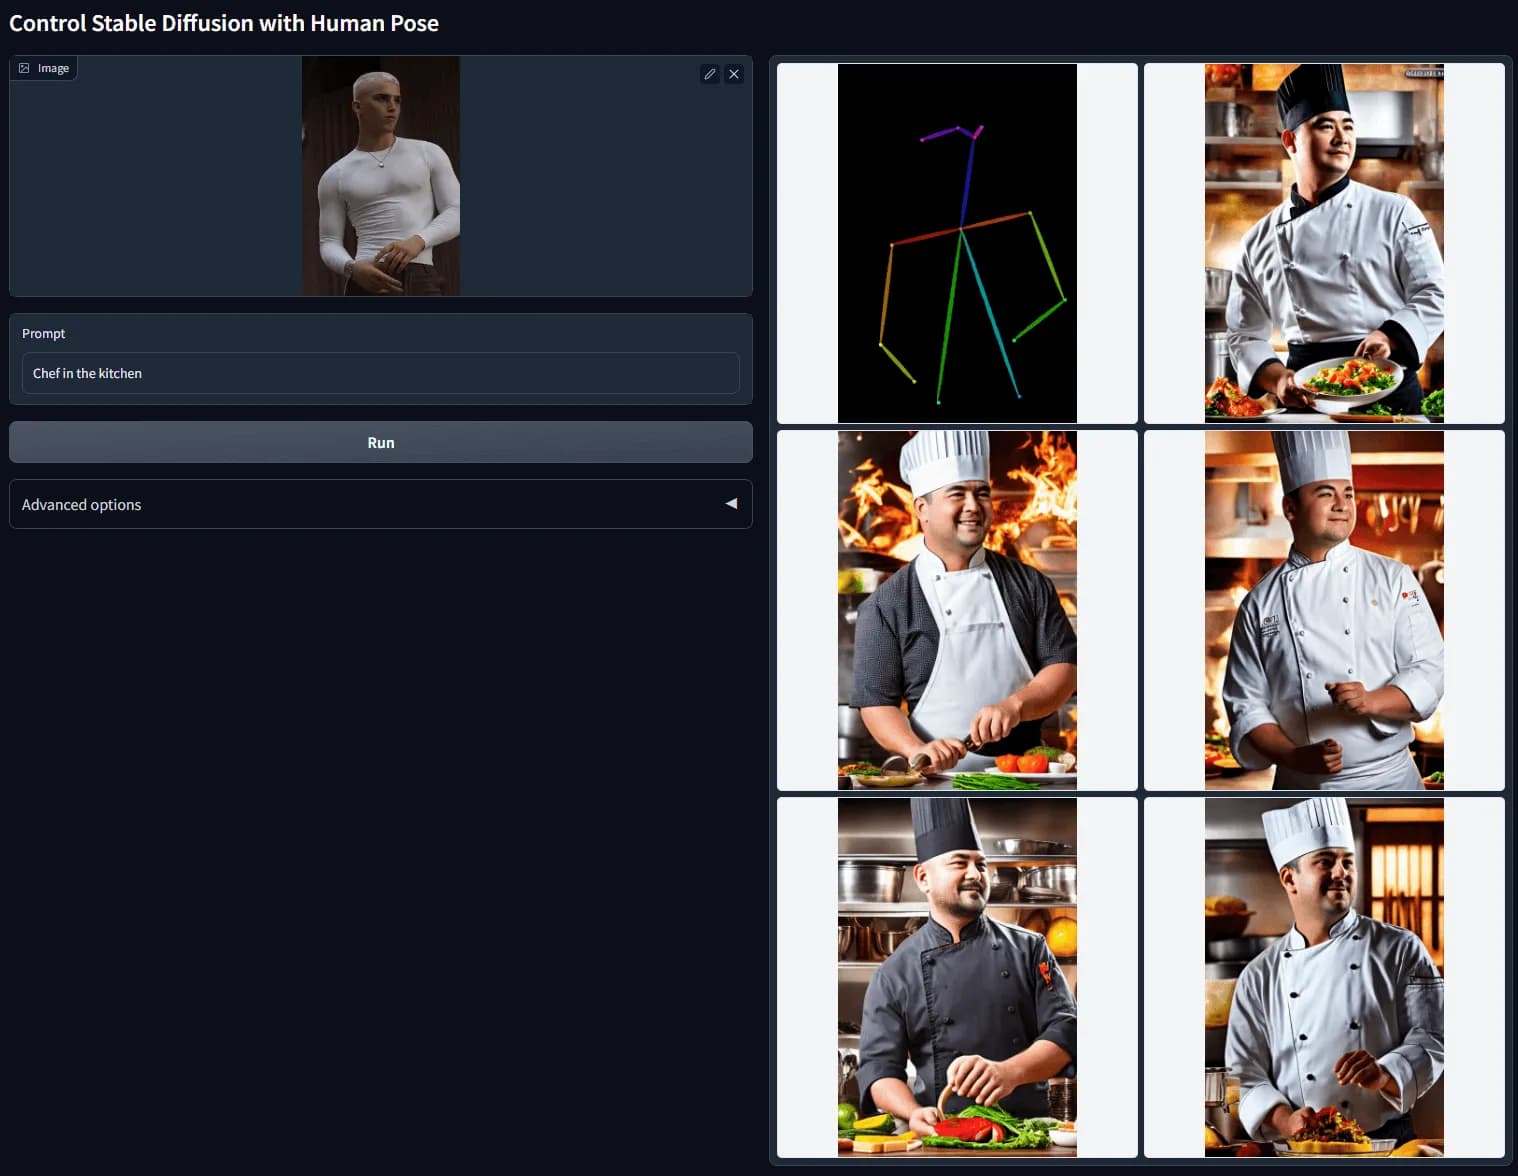 ControlNet example from their docs
Around this time, I tagged in my long time friend and co-conspirator, Yash. I’ve found I’m more likely to persist on projects when I share the excitement with a friend and this project felt like a reach for me considering I had nil experience training models. Together, we returned to the limited documentation and began to formulate a plan. In the past, IoC Lab trained a ControlNet model to generate images based on a guidance image with brightness data. While not an exact match for QR codes, the approach matched what we needed. We have an attack on the problem! We have a QR code that has bright and dark spots. We want the final image to be bright in white squares and dark in black squares.
We do, however, want a finite amount of control when generating images. If we used a brightness ControlNet model and squares came out perfectly black or white, the output image would be a regular QR code. We also must avoid the harsh edges corresponding to square borders in QR codes. Fortunately, we can exploit some properties of QR codes to generate scannable images that look nothing like traditional codes. If you’re interested in how QR codes work, I recommend this excellent post: Reading QR codes without a computer!. The tricks I cover below are separate and take advantage of how computers read codes.
 You can scan either code, despite all values being above or below 50% gray.
The absolute value of the brightness for each box doesn’t matter. QR code scanners consider the average brightness for the entire code and interpret bits based on whether the value is above or below the median. That allows us to render scannable QR codes where the entire image is brighter or darker than 50% gray. This allows us to be more flexible with the images we output. Some prompts lend themselves to lighter or darker images. Now, we can render the blocks in any color as long as they’re brighter or darker than the median pixel in the code. We must allow a small margin of error here, since a camera may not perceive the brightness value exactly.

You can still scan this code, despite the small dots
It turns out, the whole square doesn’t have to be the correct hue. QR scanners just use the value at the center of each block. This is the most important trick in our bag. Now, we can allow Stable Diffusion to put anything outside the center of each block. The fewer restrictions we can place on Stable Diffusion, the more the image outputs will resemble standard images. The corners of the three finder squares also proved unnecessary. By eliminating those, we don’t need to render garish blocks in three spots of the image. Finder squares can only ever look so good, but at least now the shapes can be more organic than sharp blocks.
With both of those tricks, we have everything we need from QR codes. Now, we just need to figure out how to train a ControlNet. Turns out, renting a single GPU is cheap. You can get an on-demand A100 for $1.29/hour at Lambda Labs. We found direction in the form of a Hugging Face blog post. I’ll avoid rehashing too much of the content, but will summarize the relevant bits. To train a ControlNet, you need a dataset consisting of three things. First, a prompt to generate an image. Second, you need a conditioning image that matches what a user might pass into your ControlNet model. Finally, you need an output image based on what you would expect the final result to look like. I’ve hinted at the solution above, but this proved to be quite a puzzle! Prompts could be easy. The conditioning image would have to be a QR code-like image so the final output could be based on that code. The hard part was cracking the output image. If we had images that looked like pictures that were scannable as QR codes, we wouldn’t need this model to begin with!
I’m going to fast forward past a few failed approaches or “learning opportunities.” We tried overlaying finder squares on images with various shapes and blending modes. In hindsight, that was hilariously foolish. We went back to the drawing board. How could we get the outputs of our ControlNet before we had it? We knew it was possible because it had already been done. That was enough to motivate us to push through. What if we generated the guidance image based on the output images?
Our goal was to constrain the output of a generated image in a few key spots. For each spot, we wanted to decide if the brightness would be above or below the average for the image. We downloaded a large dataset of AI generated images alongside the prompt used to create them. For each image, we picked a random grid size. At the center of each square on the grid, we would place a dot. If every pixel in our radius was at least 20% brighter than the median pixel, we would place a white dot. If every pixel was at least 20% darker, we would place a black dot. Else, we placed a gray dot. We made the rest of the image red.
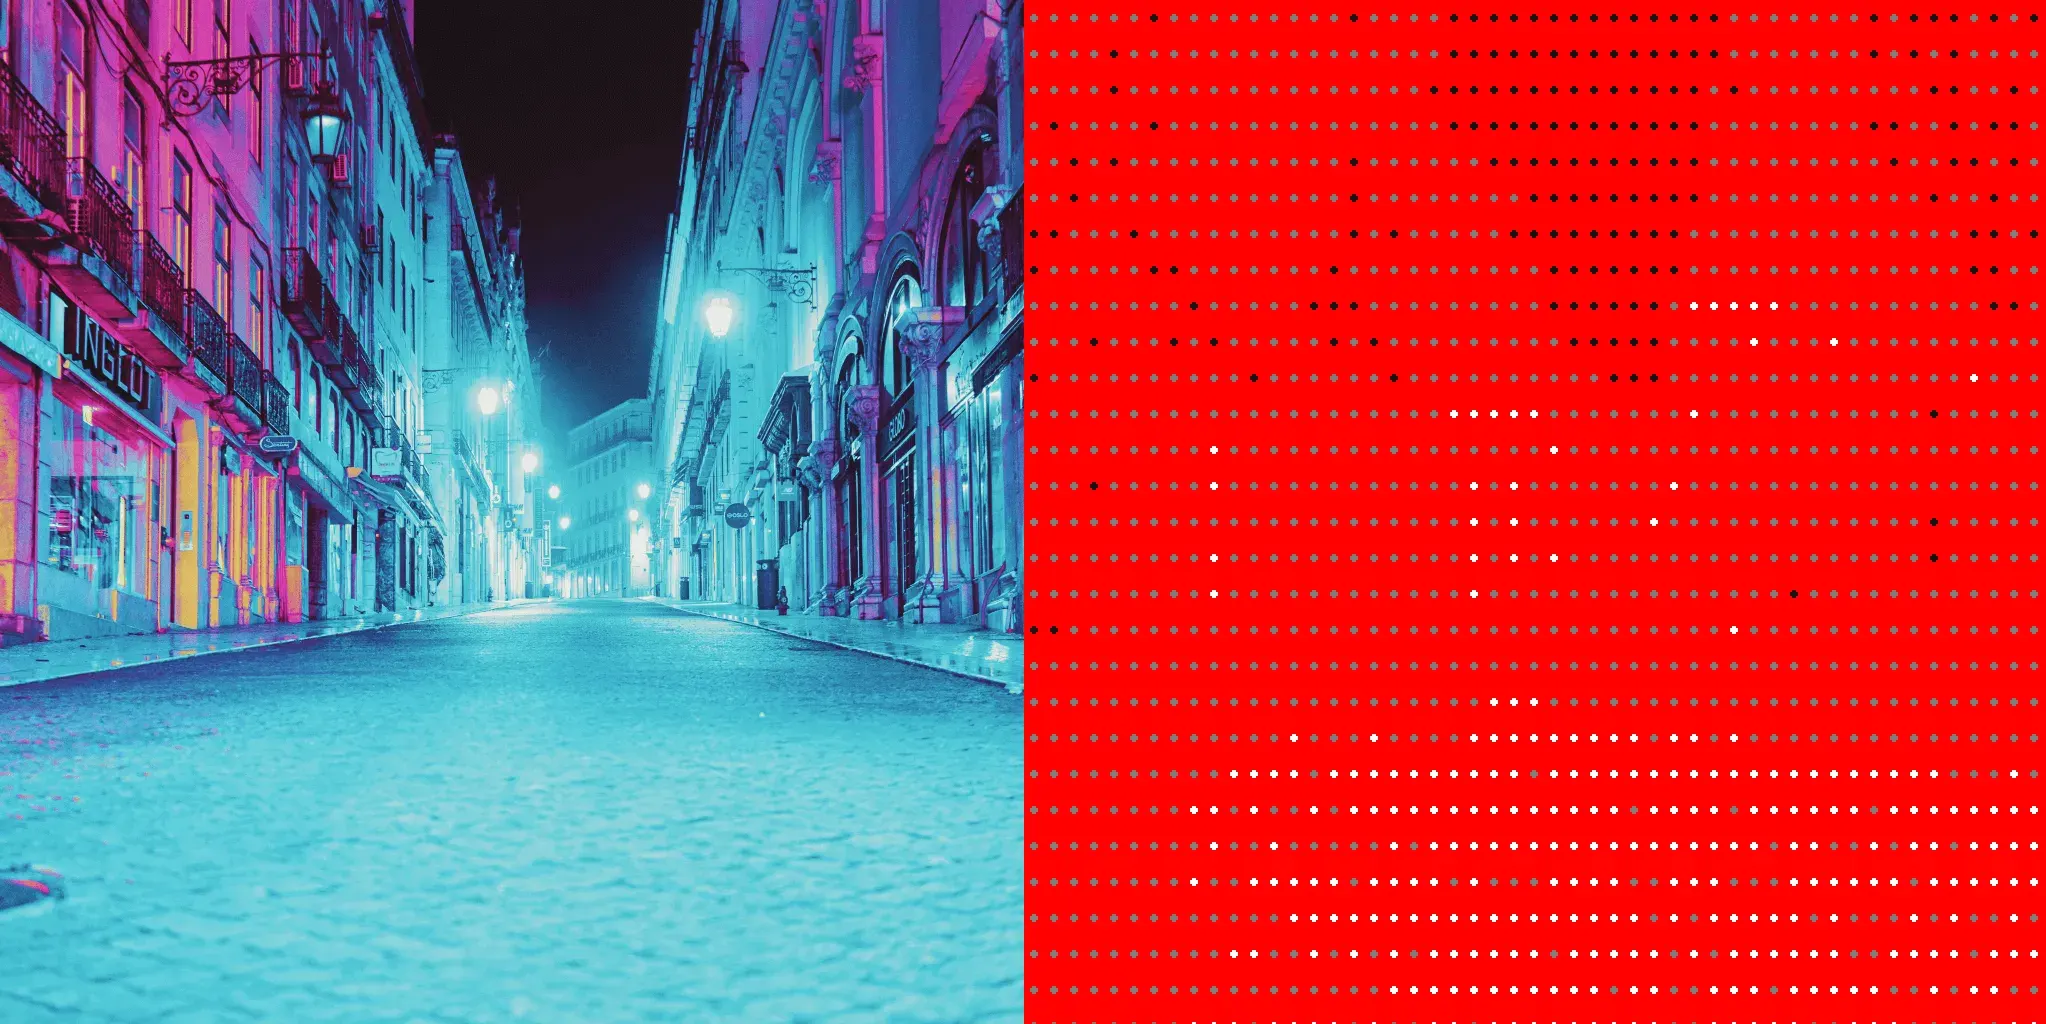 An image and the corresponding guidance image we generated from it.
Our plan was to use red to represent parts of the image that we did not want to constrain. Stable Diffusion was free to put anything in the red pixels. The white pixels must be bright, and the black pixels must be dark. Gray dots were common because we required every pixel to be above or below our target value. Our goal was to ensure that the center of each square in a generated image would clearly scan as the intended color. Grey never would appear in real conditioning images. Training our model took several iterations as we pieced together the above strategy. Each one took about 12 hours of GPU time.
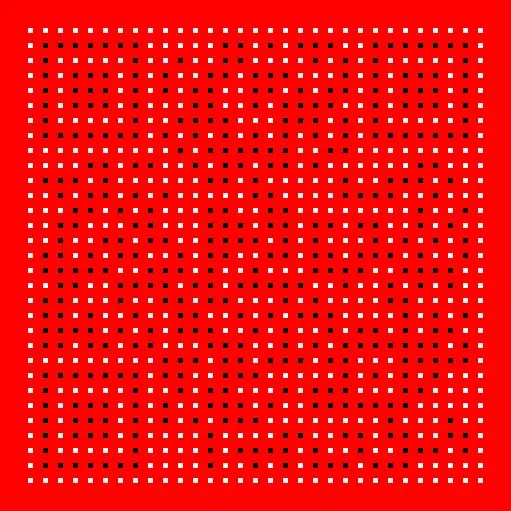
The guidance image used to generate our QR codes.
We modified a Python QR code generating library to create QR codes that matched the format of the conditioning images. The biggest difference is the finder squares. We generate large splotches of white and black to ensure enough coverage for the squares to be recognizable. Our approach worked! Not all generated images are scannable, but a significant percentage work as intended.
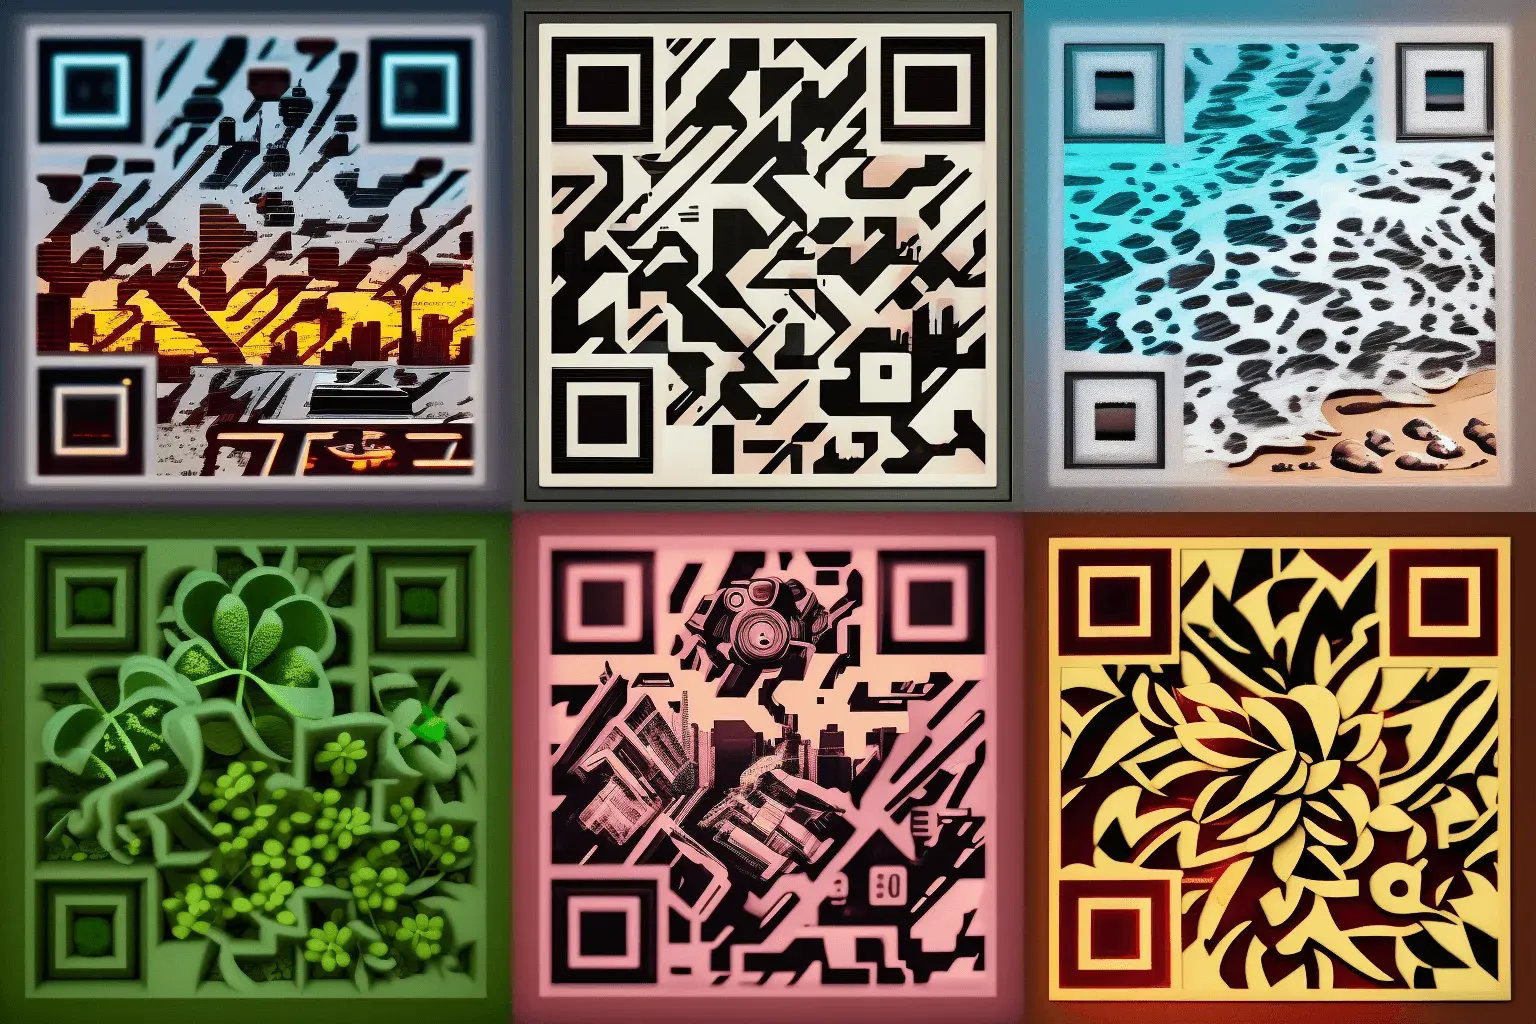 Results of our model. They all scan, but you may need to cover the other codes.
This project seemed intimidating given my lack of machine learning experience, but ended up being more smooth than I expected. Our approach above is definitely suboptimal and could be improved if we want to keep iterating. The ControlNet would be much more ergonomic if we could use standard QR codes as conditioning images. We might be able to accomplish that by training a model based on the outputs of our existing model. I’d also like to explore ways of increasing the percent of output images that scan easily. As it stands, I’m not sure if the issue is with the finding patterns or the dots, but those can be separated and tested independently. Please reach out if I made design mistakes or if you have suggested improvements. You can reach me at first + “m” + last on gmail.